

Disaster struck, the apocalypse happened, or the SHTF… You’re safe (for now) and are taking stock of what’s in your home. It looks like you’ve got a good supply of the essentials, but notice there are several closets full of unused wire hangers. They’re leftovers from all the dry cleaning you’ve been using over the years. You planned to throw them away, eventually, but never got around to it.
A wise survivalist knows it’s a good idea to reuse everything, but how can wire hangers make living after the SHTF a little easier? This article provides some ideas on how those hangers can be used as-is, bent out of shape to make simple tools, or destroyed to make something completely different[1].
As Hangers, to Hang Stuff
Hang Clothes to Free Up Storage
First and foremost, hangers should be used as… hangers. You’ll need an efficient way to store clothes and hanging is the best way to use vertical space. Take as much clothing out of the dressers as possible and hang them. This will free up storage space for more useful items like: canned or freeze-dried foods, tools, and supposedly useless electronics.
Aside from freeing up storage space, hanging clothes is faster than folding, which gives you more time to work on other survival tasks.
To Dry Clothes Faster
You can even hang wet clothes on hangers, and then hang the hanger onto a clothes-line. Use the wooden clothes-clamps to space the hangers and stop them from sliding to the center of the line (I use this trick while camping). Here’s how this drying technique makes doing laundry easier:
- The hanger allows more air to circulate within the clothes and they dry faster.
- The hanger eliminates those annoying clip wrinkles at the shoulders.
- Using hangers allows you to dry more clothes if you don’t have much rope.
- Taking clothes off the line is faster with hangers.
- The hooks can be bent shut to keep the wind from blowing your laundry away, and can easily be reshaped for hanging in the closet.
A couple things to keep in mind:
- Unless you have a clamping pants hanger, this trick won’t work with pants and shorts and they’ll need to be hung on the wire with clamps.
- You can use hangers with socks and underwear, but they need to be clipped on. It’s a good idea if you’re running out of space on the clothes line, but I find it easier to clip them directly onto the line.
As a Whip
As the movie, Mommie Dearest, showed us in 1981, hangers can be used to punish children. This long-lost method of correcting bad behavior will make a comeback after the SHTF. Think about it. Socialist media will be a thing of the past, and there won’t be swarms of opinionated people to shame and criticize parents for spanking their kids.
Disobedient kids will quickly learn how to behave once they realize they can’t report their parents to CPS because they got spanked for stealing. However, there’s a big difference between discipline and abuse. I know this from personal experience, so please don’t cross that line[2].
Lockpick
Straighten the hook part of the hanger and use it to pick a lock. A hanger lockpick will only work on internal doors because exterior locks are more complex (for good reasons).
- Stick the straightened end in the hole at the center of the doorknob.
- Feel around for the locking mechanism. This can be as easy as pushing a spring-loaded latch, or as frustrating as twisting the lock back to the unlock position.
- Twist the handle and open the unlocked door.
- Bend the top back into a hook, so it can be used as a hanger again. Also, try not to lock yourself out of that room again.
For Cooking
Starting with cooking, the following methods of using a wire hanger will destroy it as an actual hanger.
Hanging Meat
Clean, stainless-steel hangers are great for hanging meat while smoking or making biltong. I must emphasize that you shouldn’t use hangers coated with plastic because that will melt into your food.
Shish Kabobs
Again, only use stainless steel hangers to stab meat and soft vegetables before cooking over an open fire. This is great for roasting marshmallows too, but good luck finding them after the SHTF.
Drain Snake
Finding a plumber after the SHTF will be impossible and you’ll have to fix things yourself. If you’ve got a clogged pipe, take a wire hanger out of the closet and use it to unclog a drain.
- Straiten the boomerang shape out of the hanger, so it’s stretched out.
- Stick the hook-side of the hanger down the drain and rotate.
- Pull the hanger out of the drain and clean off any hair and gunk.
- Repeat this until the hanger comes out of the drain clean(ish).
- Store your new drain snake and reuse it the next time it’s needed.
I guess you could technically reshape the drain snake back into a hanger, but… eww! Why?
S-Hooks
Wire hangers can be made into s-hooks to provide quick and easy organization in the kitchen, workshop, or any room. Just keep in mind these are made of wire hangers and can’t hold large objects or multiple tools. The process of making an s-hook is simple:
- Use wire cutters to cut the hanger into 6-inch strips.
- Bend one end to form a hook. This can be done using your hands.
- Bend the other end, the opposite way to give the wire an “S” shape.
- Hang the s-hook on a rod to hang plastic spoons, spatulas, small tools, etc.
The hooks don’t have to look pretty, but they need to be functional. Some of my homemade s-hooks have pointed ends on one side, like a “V”. I find this makes the wire able to hold heavier objects when hooked to a wire shelf.
I’ve even made a few hooks with one circular end, so it functions like a hooked keychain for individual tools.
Trellis
Wire hangers can be turned into trellis to support vines and other weak plants. Plastic-covered hangers are especially good for this because the plastic protects the metal from rusting. The easiest way to make trellis out of hangers uses 6 to 8 hangers per vertical row. You’ll also need something to nail or staple them to, so if you’re building a freestanding trellis, that’s at least 2 wooden posts.
- Set 2 wooden posts in the ground, 14 inches apart.
- Orient the hangers on the side, with the hooks pointed toward the space between posts.
- Staple the “top” and “bottom” of the hangars to the posts.
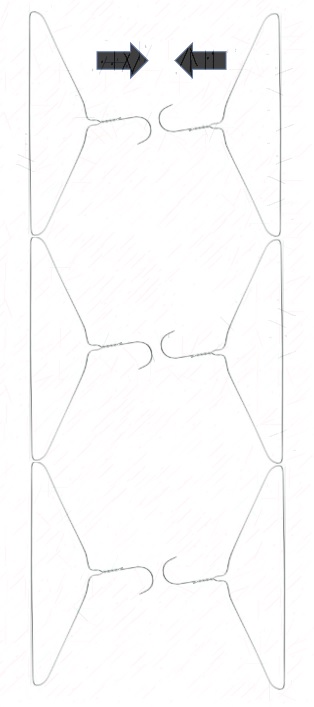
- Twist the intersecting hooks together. This should also stretch the boomerang part of the hanger into an “X” shape.
- Repeat the process until you reach the desired height. 6 wire hangers should make a trellis about 4 feet high.
- Add another post and repeat this process to expand the trellis.
I’m not a visual artist, but the hangers will be situated like this and will have more of an “X” shape.
For a slightly stronger trellis, space the posts about 8 inches apart. The process is similar, but instead of twisting the hook-ends together, they get stapled onto the opposite post. The hangers will be crossed like this:
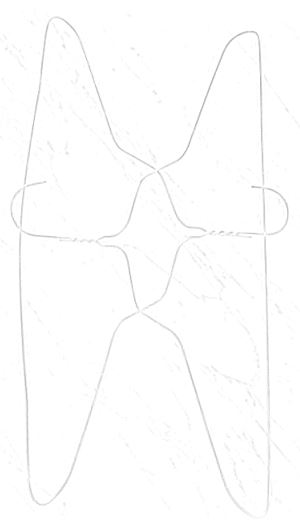
There are many other ways wire hangers can be made into trellis, but these are the 2 easiest methods I can think of. You should experiment based on the materials at your disposal and what makes sense for the garden.
Border Markers
Cut the hook ends off and straighten the wire to make thin rods. Similar to what surveyors do, the rods can be used as border markers to help visualize how much yard-space a structure will take. They can also mark where you plan to dig or as a reminder of where root vegetables are planted.
Make the rods more visible by tying a thin strip of cloth or brightly colored rope to each rod. Using different colors in a garden is a waterproof way to identify plants.
Cement Rebar
Stainless steel wire hangers can be used as rebar when building a small cement slab. Don’t use hangers with plastic coating because the cement won’t bind properly. Rebar usually isn’t needed for most small projects, but rebar could definitely help the floor/foundation support heavy equipment.
I needed a slab to support the weight of a full bathtub in a greenhouse bathroom experiment. Pouring a small slab probably would have been good enough, but I wanted to err on the side of caution. The general method I used to make the rebar was:
- Measure the area, fit the wooden border-planks, and pour concrete to about half the planned thickness.
- Cut the hook ends off and straighten the wire to make rods. Each rod should be about 30-36 inches, which is the width of most bathtubs. For a 60’x30” tub, I used about 40 wire hangers.
- Lay the rods. The rods should be spaced about 3-4 inches going down the length of the slab. Then lay a perpendicular layer of rods over the first layer, in a pattern similar to a chess board.
- Push the wire into the cement, so it’s slightly submerged at parts. This kept most of the wire from moving all over the place when I poured the rest of the concrete.
- Pour concrete to fill the top half of the slab.
Here are a few things to note with this project:
- I am not an architect and what worked for my specific project may not be suited to your needs. Use your best judgement and experience when building any structure, or hire a professional.
- This type of rebar should not be relied on for large-scale construction.
- The method I use is similar to rebar used on streets, but I think highway workers use thin wires to bind the intersecting bars together. I didn’t.
- After step 4, I noticed a few rods shifted while pouring the second half of concrete. Binding the wires would have prevented this, but I wonder if letting the concrete sit for a few hours would have worked to keep the wire in place.
Dowsing
If you’re in touch with inner psychic energy, using 2 hangers to make dowsing rods can be a way of finding resources. Albeit, a non-scientific and very unreliable method.
***
As you can see, there are several ways a survivalist can use wire hangers after the SHTF. Stay openminded and consider how other common household items may be used to make life easier in a survival situation.
I have a couple more ideas on how we can reuse common items during a survival situation. Be on the lookout for these in future articles.
[1] OMG Wreaths! I already had a nice list of dreamed-up ideas on how to reuse wire hangers after the SHTF, but thought someone else had better ideas. Most of the articles I saw online were about how to make wreaths out of them. After spending an hour looking at wreath-frames, I decided it was a damn waste of my (the author’s) time trying to research further.
I’m glad Christmas is over and won’t have to look at another wreath till November.
[2] Personal Experience with Abuse: The 5 years of hell I endured while living with my first step mother left a scar that may never fully heal. CPS was called 3 times, so you can imagine how easy it was for me to write a book about it. Writing a book was my way to come to terms, and get a little revenge from that vile woman. However, after the SHTF, such passive revenge will be a thing of the past and abused children may seek their revenge by more violent means.
Please remember readers that I do not condone violence or vigilante justice.

Pingback: Survivalists can use Rubber Bands – Edwords wOrcs
Pingback: Overlooked Survival Items – Edwords wOrcs